
Pergola on a Deck: How to Mount, Best Kits, and What to Know First

Putting a pergola on a deck is one of the most common outdoor living upgrades homeowners ask about, and for good reason. A well-placed deck pergola transforms a flat, exposed platform into a shaded living space with real character. But unlike mounting a pergola on a concrete slab or directly in the ground, deck installations come with specific structural questions that need answers before you start drilling.
This guide covers everything you need to know about installing a pergola on a deck: mounting methods, weight limits, the best kits for deck installations, permit requirements, and how to protect your deck surface throughout the process. Whether you are working with a ground-level platform deck or a second-story elevated deck, the information here will help you plan a solid installation.
Table of Contents
- Can You Put a Pergola on a Deck?
- Deck-Mounted vs Ground-Mounted Pergolas
- How to Mount a Pergola to a Deck
- Weight Limits: How Much Can Your Deck Support?
- Best Pergola Kits for Decks
- Attached to House + On Deck
- Freestanding Pergola on a Deck
- Permit and Code Considerations
- Protecting Your Deck During Installation
- FAQ
Can You Put a Pergola on a Deck?

Yes, you can absolutely put a pergola on a deck. Thousands of homeowners install deck pergolas every year, and when done correctly, the result is a stable, long-lasting outdoor structure that adds both shade and property value. The key phrase there is "when done correctly." A deck is not the same as a concrete slab or an in-ground footing, so the installation approach needs to account for the deck's load capacity, framing layout, and material.
The three biggest factors that determine whether your deck can support a pergola are:
- Joist size and spacing: Standard residential decks use 2x8 or 2x10 joists spaced 16 inches on center. This framing can typically handle a pergola on deck installation when posts are positioned directly over or near joists.
- Post and beam sizing beneath the deck: The support posts and beams under your deck need to carry not just the deck's live load, but also the added weight of the pergola, any snow load, and wind forces.
- Decking material: Composite decking, pressure-treated lumber, hardwood like ipe, and PVC decking all respond differently to bolt holes and compression. Each material requires specific hardware and technique.
Lastly is the integrity of the deck itself. Putting a pergola on a 20 year old deck with joists that are soft and rotten is a different conversation than a pergola on a 3 year old deck that was built to today’s IRC codes. If you have a 3 year old deck that was built to current codes, you’re more than likely safe to build a pergola. If you’re unsure of the structure of your deck, you should have a contractor or engineer inspect it before building.
Also, keep in mind that the type of material your pergola is made from makes a big difference when installed on a deck. A solid wood pergola is going to put much more weight on the deck than an aluminum pergola kit. We will cover that comparison later.
Deck-Mounted vs Ground-Mounted Pergolas

When you want a pergola over your deck, you have two fundamental approaches: mount the posts to the deck surface itself, or run the posts through the deck (or next to it) and anchor them in the ground below. Both methods work, but they solve different problems and come with different tradeoffs.
Quick Comparison
| Factor | Deck-Mounted | Ground-Mounted (Through Deck) |
|---|---|---|
| Installation complexity | Moderate. Surface mount with bolts through decking and into joists. | High. Requires cutting deck boards, digging footings, pouring concrete. |
| Structural strength | Very good with proper blocking and through-bolts. Limited by deck framing capacity. | Excellent. Posts are anchored independently of the deck structure. |
| Best for | Lightweight aluminum pergolas, newer decks with solid framing, DIY installers | Heavy wood pergolas, older decks, high wind/snow areas, elevated decks |
| Deck damage | Minimal. Bolt holes through surface boards only. | Significant. Requires cutting openings in the deck surface for posts to pass through. |
| Reversibility | High. Remove bolts, patch holes, deck is restored. | Low. Concrete footings are permanent and deck cutouts need repair if removed. |
| Cost | Lower. No excavation or concrete work needed. | Higher. Excavation, concrete, flashing, and additional labor. |
| DIY-friendly? | Yes. Most homeowners with basic tools can handle this. | Somewhat. Concrete footings and deck cutting add difficulty. |
Our suggestion: Deck mounted is the best installation for most pergolas and the best one for any pergola made from aluminum. It is quicker, less invasive, completely reversible and certainly strong enough if done correctly with the right hardware and an engineered pergola. Going through the deck to a footing below is a good idea for very heavy wood pergolas or for deck framed with undersized lumber for surface mounted pergolas.
If you have a raised deck (second story or on a slope) then you almost always want to go with deck mounted posts. Long spans of post extending from the ground to a tall deck (with nothing to brace them in the middle) have their own flex and structural issues.
How to Mount a Pergola to a Deck

Mounting a pergola to a deck is a straightforward process once you understand where the loads go and how to transfer them safely into the deck's framing. Here is the step-by-step overview:
Step 1: Locate Your Joists
Before you drill a single hole, you need to know exactly where your deck joists run. Use a stud finder, look for the fastener pattern on the deck surface, or access the underside of the deck to visually locate each joist. Every pergola post must either sit directly over a joist or be supported by blocking installed between joists.
Step 2: Add Blocking (If Needed)
If your post locations do not land directly on a joist, you will need to install blocking between the joists beneath the deck. Blocking is simply a piece of lumber (matching your joist size) cut to fit snugly between two joists and secured with structural screws or joist hangers. This creates a solid platform beneath the decking for your post base to bolt into.
Step 3: Install Post Base Plates
Most deck-compatible pergola kits include surface-mount post base plates. These are heavy-gauge steel or aluminum plates that bolt to the deck surface and receive the pergola posts. The base plate distributes the post load across a wider area, reducing point pressure on the decking.
For a deck mounted pergola, always use through-bolts (not lag screws) that pass completely through the decking, through any blocking, and are secured with washers and nuts on the underside. Through-bolts provide vastly more withdrawal resistance than lag screws and are the standard for structural connections on deck pergola installations.
Step 4: Through-Bolt the Base Plates
Drill through the deck boards and into/through the joist or blocking below. Use 1/2-inch diameter stainless steel or hot-dipped galvanized carriage bolts. Each post base typically requires 4 bolts. Tighten with a washer and nut beneath, but do not over-torque, as you do not want to crush the decking material.
Step 5: Set and Plumb the Posts
Slide or bolt the pergola posts into the base plates. Use a level to confirm each post is perfectly plumb in both directions. Most quality pergola kits have adjustable post bases that allow minor corrections during this step.
Step 6: Assemble the Pergola Frame
With the posts secure and plumb, follow the kit manufacturer's instructions to install the beams, purlins, and louver system. A well-engineered aluminum pergola kit typically takes 2-3 people about 4-8 hours to fully assemble on a deck.
Ledger Board Attachment (For House-Attached Pergolas)
If your pergola on a deck will also attach to the house wall, you will need a ledger board. This horizontal beam bolts to the house framing (not just siding) and carries one side of the pergola. Use lag bolts into the house rim joist or wall studs, with proper flashing to prevent water intrusion behind the ledger. More on this in the attached pergola section below.
Weight Limits: How Much Can Your Deck Support?

Understanding your deck's load capacity is the single most important step before installing a pergola on deck. Every deck has two load ratings that matter:
- Live load: The weight of people, furniture, and anything temporary. Most residential decks are designed for 40 psf (pounds per square foot) of live load, though many jurisdictions now require 50 or even 60 psf.
- Dead load: The weight of the deck structure itself, plus anything permanently attached to it. Standard dead load design is 10-15 psf. Your pergola falls into this category.
Typically a deck is required to support 50-75 psf (pounds per square foot) of total load (live and dead). If you have a deck and you’re considering a pergola on it, that is the number you are concerned with.
Pergola Weight by Material
Here is where material choice becomes critical for deck installations:
| Material | Typical Weight (10x12 size) | Weight per Post | Deck Suitability |
|---|---|---|---|
| Wood (cedar/redwood) | 800-1,200 lbs | 200-300 lbs | Marginal. Heavy point loads stress deck framing. |
| Pressure-treated lumber | 1,000-1,500 lbs | 250-375 lbs | Poor. Heaviest option, often requires ground mounting. |
| Vinyl/fiberglass | 300-600 lbs | 75-150 lbs | Decent weight, but lower structural ratings. |
| Commercial-grade aluminum | 400-600 lbs | 100-150 lbs | Excellent. Lightest structural option with highest performance ratings. |
Simple math really. The load from a commercial aluminum pergola on its footings would be in the realm of 100-150 lbs. per post. On a typical deck with a 50 psf total load, this load is completely manageable when the posts are placed on top of a joist with appropriate blocking.
A wood pergola can easily impose 300+ pounds per footings, and this is without a snow load. If you live in a snow belt, the extra snow load for a 65 psf pergola will add 200-400 pounds per post on a storm day. This amount can get close or even exceed a typical deck framing load.
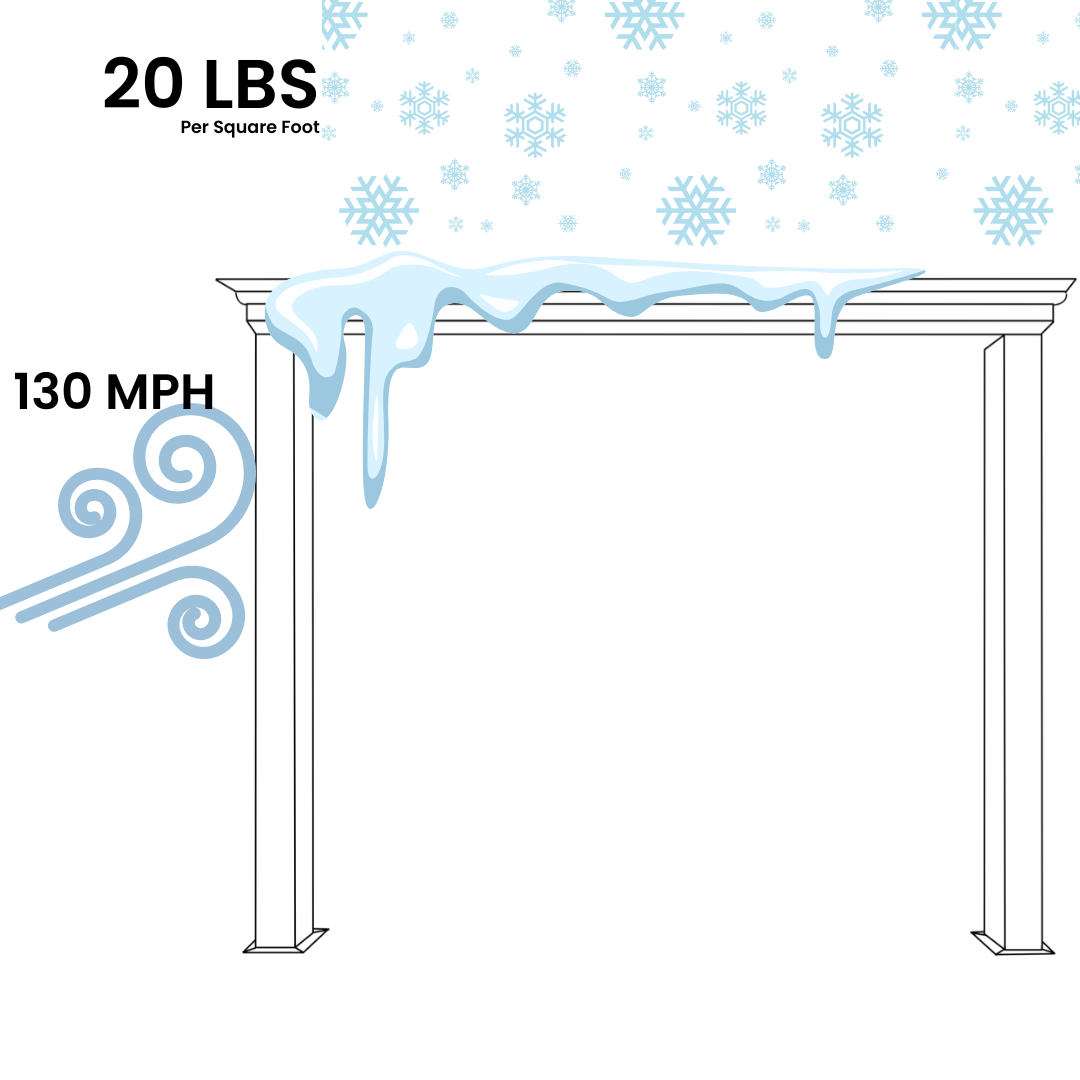
This is what makes aluminum the perfect choice for a pergola on a deck. It has the highest strength-to-weight ratio of any pergola material. A good quality aluminum pergola will carry over 200+ mph wind loads (closed) and over 65 psf of snow and yet it will be a fraction of the weight of a wood pergola. For deck pergolas, that combination of light weight and high strength is not just a benefit, it is what will allow for a simple surface mount installation instead of a major structural project.
How to Check Your Deck's Capacity
If you can’t tell if your deck will support the additional weight of a pergola for a deck, consider this:
- Check your building permit records. Your original deck permit should list the design loads. Contact your local building department if you do not have a copy.
- Inspect the framing. Get under the deck and look at joist size, spacing, span length, and connection quality. Standard 2x10 joists at 16-inch spacing over a 12-foot span is solid framing for a deck pergola.
- Look for signs of deterioration. Soft wood, visible rot, rusty fasteners, or sagging joists are all red flags. Address any structural issues before adding load.
- Consult a structural engineer. For elevated decks or any situation where you are not confident, a one-hour consultation with a structural engineer ($200-$500) gives you a definitive answer and documentation for your permit application.
Best Pergola Kits for Decks

Not every pergola kit is designed for deck mounting. The best pergola kits for decks share a few specific characteristics that make them compatible with surface-mounted installations:
What Makes a Kit Deck-Friendly
- Lightweight construction: Aluminum kits in the 400-600 lb range keep point loads within standard deck framing capacity.
- Surface-mount post bases: Base plates designed to bolt directly to deck surfaces without requiring concrete footings.
- Adjustable footprint: Kits with customizable widths and depths let you match your post locations to your joist layout.
- Integrated drainage: Louvered pergolas that channel water through the posts keep rain off your deck surface and away from bolt penetrations.
- High strength-to-weight ratio: The kit needs to handle real wind and snow loads without relying on mass (heavy materials) for stability.
The Luxury Pergola: Built for Deck Installations

The Luxury Pergola is a commercial-grade aluminum louvered pergola kit manufactured in Indiana and shipped direct to homeowners. It checks every box for deck compatibility:
- Weight: Engineered aluminum construction keeps the total structure weight manageable for deck framing while maintaining massive structural ratings.
- Wind rating: Rated for up to 200+ mph winds (louvers closed). This is not theoretical. These are engineered, tested specs.
- Snow load: Handles up to 65 psf, which is 3-7x more than competing pergola kits.
- Mounting: Surface-mount post bases included. Designed for through-bolt attachment to deck framing.
- Sizing: Available in sizes from 8x8 all the way up to 20-foot spans, with adjustable configurations to match your deck dimensions.
- Motorized louvers: 130-degree rotation via remote control for on-demand shade, light, and rain protection.
- Flat ceiling design: Clean, modern look from below. No exposed louver mechanisms or curved profiles.
- Lifetime warranty: Frame, louvers, motor, and electronics. Made in America with ElectroLayer powder coating that will not fade.
- Drainage: Integrated gutter system channels rain through the posts, keeping your deck dry.
If you're considering a pergola on deck installation, aluminum is the right material for you. The Luxury Pergola is the sturdiest, most deck-friendly option on the market. Use the product configurator to build your pergola in the exact size you want and see the price.
Other Deck-Compatible Options
If aluminum is not in your budget, here are alternatives to consider:
- Cedar or redwood pergola kits: Beautiful natural look, but heavier (800-1,200 lbs), require annual maintenance, and will eventually rot. Deck mounting is possible but may require additional framing reinforcement.
- Vinyl pergola kits: Lightweight and maintenance-free, but lower wind and snow ratings. Fine for mild climates but not built for serious weather.
- Steel pergola kits: Strong but heavy and prone to rust without proper coating. Not ideal for deck installations due to weight.
If you want to read a detailed overview of the top pergola kits at every price level, you'll find it in our best pergola kits article.
Attached to House + On Deck

The most common deck pergola configuration is a wall-mount plus deck-mount combination. One side of the pergola attaches to the house via a ledger board, and the other side is supported by two freestanding posts bolted to the deck surface. This setup offers several advantages:
- Fewer posts on the deck: Only 2 posts instead of 4, which means less hardware penetrating your deck surface and more open floor space.
- Stronger overall connection: The house wall provides a rigid attachment point that adds stability beyond what the deck alone provides.
- Cleaner look: An attached pergola on a deck creates a seamless transition from indoor to outdoor living. It reads as an extension of the house rather than an add-on sitting on the deck.
- Better for elevated decks: When the house wall carries half the load, the deck framing handles significantly less stress.
How the Ledger Board Works
The ledger board is the horizontal piece of lumber that attaches to the house. The ledger board is used to hold the side of the pergola that is attached to the house. The ledger for a deck pergola attached to the house should:
- Attach to structural framing, not just siding. The bolts need to reach the house's rim joist or wall studs.
- Use 1/2-inch lag bolts or through-bolts spaced per the pergola manufacturer's specifications (typically 16-24 inches on center).
- Include proper flashing. Z-flashing or self-adhered membrane behind and above the ledger prevents water from getting behind the siding and into the wall cavity. This is non-negotiable.
- Be installed at the correct height to maintain proper pitch for drainage. The house side should be slightly higher than the outer (deck post) side so rain runs away from the house.
Most quality pergola kits, including our louvered pergola systems, come with wall mount hardware and instructions on how to attach a ledger board to your home. The ledger board attached to your home and the deck posts attached to your deck create the most secure pergola over deck configuration with the fewest number of deck penetrations.
Freestanding Pergola on a Deck

A freestanding pergola on a deck uses four posts, all mounted to the deck surface, with no wall attachment. This is the right choice when:
- Your deck is not adjacent to the house. Island decks, pool decks, and standalone platforms need a freestanding structure.
- You want the pergola centered on the deck rather than flush against the house wall.
- The house wall is not suitable for attachment (stone veneer, EIFS, or siding that cannot accept a ledger board).
- You want maximum flexibility. A freestanding deck pergola can be repositioned (in theory) if you ever reconfigure your deck layout.
Weight Distribution Matters More with Freestanding
The reason that a freestanding pergola places more of a burden on the deck is that the deck is supporting the weight of the pergola by itself. with no assistance from a house wall. That is to say:
- All four post locations need solid backing. Every post must sit over a joist or have blocking installed between joists.
- Through-bolts at every post are essential. Do not rely on lag screws alone for a freestanding deck mounted pergola.
- Wind uplift becomes a bigger concern. Without a house wall to brace against, the pergola relies entirely on the deck connection to resist wind forces. Use the largest base plates your kit provides, and consider adding hurricane ties or additional blocking if you are in a high-wind region.
With a freestanding pergola on a deck, this is even more important than with an attached pergola. The heavier the pergola, the more load it places on the deck frame. A commercial grade aluminum pergola will keep the load per column within reason, while providing the engineering you need for wind and snow.
A freestanding pergola can also be used over a deck with a dining area, fire pit, or hot tub. If you locate the four posts where they will surround your seating area, it makes the pergola the center of the deck’s focal point.
Permit and Code Considerations
Whether a pergola on a deck requires a building permit depends on your local jurisdiction, and rules vary significantly from one municipality to the next. Here is what you need to know:
When You Probably Need a Permit
- The pergola has a solid or operable roof. Louvered pergolas that close fully are often classified as "roofed structures" and may require a permit, even if traditional open-rafter pergolas do not.
- The structure exceeds a height threshold. Many jurisdictions require permits for structures over 10 or 12 feet tall.
- The pergola is attached to the house. Wall-mounted structures typically trigger a permit requirement because they modify the building envelope.
- You are modifying the deck. Adding blocking, cutting deck boards, or increasing the load on an existing deck may require a separate structural permit.
- Your HOA has rules. Homeowner associations often have their own approval process independent of building codes.
Common Code Requirements
When a permit is required, inspectors typically look for:
- Wind load rating: The pergola must be rated for the design wind speed in your area. Most of the U.S. falls between 90-150 mph basic wind speed. High-wind coastal zones can require 170+ mph. A pergola rated for up to 200+ mph wind (like The Luxury Pergola) meets or exceeds requirements in every wind zone in the country.
- Snow load rating: Northern states require structures to handle regional ground snow loads. The pergola's snow load capacity must meet or exceed your local requirement, which can range from 20 to 70+ psf depending on location.
- Setback requirements: How far the structure must be from property lines. Typically 3-10 feet depending on the zone.
- Maximum height: Usually measured from the deck surface (not ground level) to the top of the pergola.
- Engineered drawings: Some jurisdictions require stamped structural engineering documents. Quality pergola manufacturers provide engineering specs and can supply stamped drawings for permit applications.
Pro tip: Check with your local building department before ordering your pergola. A 5-minute call will save you weeks of delays. Be sure to ask about the pergola/shade structure requirements for deck mounted units and if they require an engineered package with the application.
If you want to learn more about how pergola costs factor into your overall project budget, including permits, labor, and more, read our cost guide here.
Protecting Your Deck During Installation
Drilling bolts through a deck creates potential entry points for water, which can lead to rot, mold, and structural damage over time. Protecting your deck during and after a pergola installation is about sealing those penetrations and managing water properly.
Preventing Water Damage at Post Bases
- Apply sealant to every bolt hole. Before inserting bolts, fill each hole with a bead of exterior-grade polyurethane sealant (Sikaflex or similar). This seals the end grain of wood decking or the drilled edges of composite, preventing water from wicking into the material.
- Use stainless steel hardware. Galvanic corrosion between dissimilar metals (like zinc-coated bolts and aluminum post bases) can cause staining and premature fastener failure. Stainless steel bolts, washers, and nuts eliminate this problem.
- Install post base gaskets. Many quality post bases include rubber or EPDM gaskets between the base plate and the deck surface. These create a waterproof barrier and prevent the metal plate from trapping moisture against the decking.
- Ensure proper drainage slope. Your deck should already have a slight slope (1/8 inch per foot minimum) away from the house. Confirm this before installation and make sure the pergola post bases are not creating dams where water can pool.
Special Considerations for Composite and PVC Decking
Composite and PVC deck boards are more susceptible to compression than wood. These boards can be permanently dented or deformed with heavy point loads. Here is how to address this:
- Use the largest post base plate possible. A wider base distributes load across more surface area, preventing compression marks.
- Add a pressure-distribution pad. A thin piece of HDPE or stainless steel between the post base and the composite decking spreads the load even further.
- Never over-torque bolts. Composite decking can crack or deform if bolts are cranked too tight. Tighten until snug, then stop.
What About Waterproof Deck Membranes?
If you have a waterproof membrane (which is typically the case for raised decks that have a roof to the area below), you shouldn’t drill through it. Instead, consider: You could however:
- Surface-mount clamp systems that grip the deck without penetrating the membrane.
- Running posts alongside the deck and anchoring to the substructure below the membrane.
- Consulting the membrane manufacturer for approved penetration methods and compatible sealants.
If you follow these tips, a pergola built over your deck shouldn’t leak and rot or cause you any grief. The idea is straightforward: flash all penetrations, bolt all joints, and always provide a way for water to escape.
Frequently Asked Questions

Can you put a pergola on a deck without drilling?
There are weighted and clamping systems that avoid drilling, but they are only suitable for very lightweight, small pergolas in low-wind areas. For any full-size deck pergola, especially one with a louvered or solid roof, through-bolting to the deck framing is the only method that provides adequate structural support and meets building code requirements. The bolt holes are small and easily sealed.
How much weight can a standard deck support for a pergola?
Most residential decks are designed for a total load of 50-75 psf (combined live and dead load). A commercial-grade aluminum pergola adds roughly 3-5 psf of dead load to the deck, which is well within the capacity of a code-compliant deck. The concentrated post loads (100-150 lbs each for aluminum) are easily handled when posts are positioned over joists with proper blocking.
Do I need a permit for a pergola on my deck?
It depends on your local jurisdiction. Many areas require permits for any roofed structure attached to a house or any structure over a certain height. Freestanding open-rafter pergolas under 10-12 feet often do not require permits, but louvered or solid-roof pergolas frequently do. Call your local building department to confirm before you start your project.
What is the best material for a deck pergola?
Aluminum is the best material for a pergola on deck installation by a wide margin. It offers the highest strength-to-weight ratio, requires zero maintenance, resists corrosion, and comes with the best warranty coverage. Wood pergolas are heavier, require annual maintenance, and eventually rot. Vinyl is lighter but structurally weaker. For deck mounting specifically, aluminum's light weight means less stress on your deck framing while still delivering superior wind and snow performance.
Can I put a pergola on a second-story deck?
Yes, but elevated decks require more careful structural evaluation. The deck framing on a second-story deck carries additional gravity loads due to its height, and the pergola adds both weight and wind exposure. Surface-mount installation (bolting to the deck) is almost always the better approach for elevated decks versus trying to run posts from ground level. Have a structural engineer verify that your elevated deck can handle the added pergola load.
How do I keep water from getting into my deck through the bolt holes?
Seal every bolt hole with exterior-grade polyurethane sealant before inserting the hardware. Use stainless steel bolts and washers to prevent corrosion. Install gaskets between the post base plates and the deck surface. And make sure your deck maintains proper drainage slope so water does not pool around post base locations. These steps, combined with the integrated drainage system found in quality louvered pergola kits, keep your deck protected for the long term.
What size pergola works best on a deck?
The ideal size depends on your deck dimensions and how you use the space. A 10x12 or 10x13 pergola covers a standard 4-6 person dining area comfortably. A 12x16 or larger is better for full outdoor living rooms with couches and a dining set. For pergola ideas sized to different deck layouts, check our complete idea gallery. The Luxury Pergola offers sizes from 8x8 up to 20-foot spans, so you can match your exact deck dimensions.
Is a freestanding or attached pergola better for a deck?
An attached (wall-mounted) pergola is generally better for deck installations because the house wall carries half the load, reducing stress on the deck framing. It also provides a more rigid overall structure and requires fewer deck penetrations (2 posts instead of 4). A freestanding pergola is the right choice when the deck is not adjacent to the house, the wall material cannot accept a ledger board, or you want the pergola positioned away from the building.
Ready to Design Your Deck Pergola?
The Luxury Pergola's aluminum louvered pergola kits are built for deck installations. Lightweight, surface-mount ready, and backed by a lifetime warranty. Use the configurator to build your exact size and see pricing.
